Table of Contents
- Introduction
- Understanding Outline Stitches
- Common Reasons for Broken Outlines
- How to Start Fixing Outline Stitches
- Machine Settings and Stabilization
- Testing and Quality Checks
- Preventing Future Outline Stitch Issues
- Professional Help for Consistent Results
- Conclusion
Introduction
Fixing Outline Stitches is essential for clean, professional embroidery. When outline stitches in a digitized logo misalign or appear broken, the whole design can look distorted. This guide explains causes, diagnosis, fixes, and prevention so your final embroidery is precise and durable.
If you prefer expert help, professionals such as Quality Digitizing can optimize files and ensure production-ready outlines.
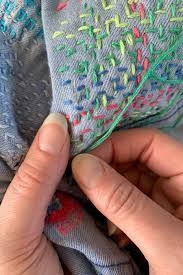
Understanding Outline Stitches
Outline stitches form the borders that define a logo’s edges. They hide rough fill edges and create a sharp finish. Outlines must align perfectly with fills; any offset in the stitch path causes visible gaps or overlaps.
Fixing outlines reliably requires careful attention to underlay, density, stitch sequence, and stabilization.
Common Reasons for Broken Outlines
Before you begin Fixing Outline Stitches, identify the likely cause. Typical issues include:
- Improper digitizing path: open or misaligned vector paths create gaps.
- Incorrect stitch density: too high or too low density causes breaks or puckering.
- Unstable fabric or hooping: fabric shift displaces outline alignment.
- Inadequate underlay: top stitches sink without a solid foundation.
- Tension or thread problems: poor thread quality, wrong tension, or blunt needles cause broken outlines.
How to Start Fixing Outline Stitches
1. Analyze the Stitch File
Open the digitized file and inspect the outline layer. Zoom in and verify the outline path follows the fill edge exactly. Manually realign nodes when auto-tracing introduces gaps.
2. Adjust Stitch Type
Thin outlines usually use running stitches; thicker outlines need satin stitches. Choose stitch types that match the outline width and fabric characteristics.
If you want professional alignment, services like Quality Digitizing can produce expertly aligned outlines.
3. Set Proper Density and Length
Maintain appropriate density by fabric type. Too much density causes puckering; too little leaves gaps. For satin outlines, aim for balanced stitch length and moderate density (adjust per fabric).
4. Reorder Stitch Sequence
Always stitch fills first, then outlines. Outlines running last clean up fill edges and hide minor imperfections. Reordering sequence prevents many common breaks.
Machine Settings and Stabilization
Machine setup strongly affects outline quality. Key checkpoints:
- Use the correct stabilizer type (cut-away for knits, tear-away for woven fabrics).
- Maintain consistent upper and bobbin thread tension.
- Use sharp, properly sized needles for your thread and fabric.
- Keep hoop tension consistent to prevent fabric movement mid-stitch.
A balanced machine setup helps outlines remain crisp and uniform throughout long runs.
Testing and Quality Checks
Always run a sample stitch on a scrap piece of the intended fabric. Inspect alignment, edge crispness, and stitch direction. Make incremental adjustments to density, underlay, or stitch angle as needed.
Repeat testing until the outline consistently appears correct under your production conditions.
Preventing Future Outline Stitch Issues
To avoid repeated problems, adopt these preventive steps:
- Manually align outline paths after auto-tracing artwork.
- Save material-specific settings (density, underlay, needle type).
- Perform test stitches before every bulk run.
- Maintain machine service schedules and replace needles regularly.
Professional Help for Consistent Results
If broken outlines are frequent, outsourcing to experienced digitizers saves time and waste. Professionals use advanced software and proven workflows to deliver balanced densities, clean paths, and production-ready files.
For industry references on embroidery standards and best practices, see Textile World: textileworld.com.
For hands-on file optimization, consider Quality Digitizing.
Conclusion
Fixing Outline Stitches is about more than patching visible gaps — it’s mastering digitizing precision. Identify the root cause, correct file sequencing and density, test thoroughly, and maintain machine discipline to ensure professional results every time.
Invest in quality digitizing and regular QA to keep logos sharp and outlines consistent across all production runs.
Tags: Fixing Outline Stitches, Embroidery Digitizing, Logo Outlines, Stitch Repair, Embroidery Quality


