Table of Contents
- Introduction to Converting Digital Logos into Stitch Files
- Understanding Stitch Files and Their Importance
- Preparing Your Digital Logo for Conversion
- Step-by-Step Process to Convert Digital Logos into Stitch Files
- Best Software for Logo-to-Stitch Conversion
- Common Mistakes to Avoid During Conversion
- Benefits of Professional Digitizing Services
- Expert Tips for Perfect Stitch Files
- Conclusion and Call to Action
Introduction to Converting Digital Logos into Stitch Files
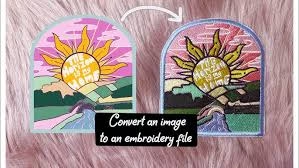
Convert Digital Logos into Stitch Files — this process is essential for anyone who wants to transform a digital design into an embroidery-ready format. Whether you’re a business owner, designer, or embroiderer, understanding how to convert logos into stitch files ensures your designs appear crisp, clean, and professional when embroidered.
In embroidery, the journey from a simple image to a finished stitched logo begins with digitizing. This process involves mapping every color, shape, and curve of your logo into stitches that an embroidery machine can understand. Professional services like Quality Digitizing make this process simple, fast, and precise—helping you achieve flawless embroidery results every time.
Understanding Stitch Files and Their Importance
A stitch file is a special digital file that contains instructions for embroidery machines. It tells the machine where to place stitches, what type of stitches to use, and how to apply colors. Without a stitch file, even the most beautiful logo cannot be embroidered accurately.
Common stitch file formats include DST, PES, EXP, and JEF, each corresponding to different embroidery machine brands. To understand how these formats work in detail, you can refer to Wikipedia’s embroidery machine overview, which explains how embroidery machines read and interpret stitch data.
By learning how to convert digital logos into stitch files, you bridge the gap between digital art and real-world textile branding—making your logo ready for caps, uniforms, t-shirts, and promotional materials.
Preparing Your Digital Logo for Conversion
Before you begin the conversion process, proper preparation of your logo file is crucial. A well-prepared logo saves time and ensures a smoother digitizing process. Follow these tips to get started:
- Use a high-resolution image (at least 300 DPI) for best accuracy.
- Ensure your logo is clean, with sharp outlines and solid colors.
- Avoid gradients, shadows, or 3D effects—these don’t translate well in stitches.
- Convert text into vector outlines to maintain shape consistency.
If you need help refining your logo for embroidery, you can reach out to Quality Digitizing, where professional designers prepare and optimize your logo before digitizing begins.
Step-by-Step Process to Convert Digital Logos into Stitch Files
The process of converting digital logos into stitch files involves multiple steps that require precision and expertise. Below is a detailed breakdown:
Step 1: Import Your Design
Start by importing your digital logo (in PNG, JPG, or vector format) into embroidery digitizing software. This is the base from which your stitch file will be created.
Step 2: Set Design Parameters
Define size, stitch type, density, and color settings based on the material to be embroidered. Each fabric type requires specific stitch adjustments to prevent puckering or distortion.
Step 3: Digitize the Design
This is the core step where every element of your logo is manually converted into stitch patterns. Skilled digitizers ensure correct stitch angles, underlays, and sequence for perfect thread flow.
Step 4: Simulate and Test
Run a simulation to preview how your design will stitch. This helps spot alignment or color issues before the actual embroidery begins.
Step 5: Export to Stitch File
Once satisfied with the preview, export the design as a stitch file in the appropriate format (e.g., DST or PES). This file can now be loaded directly into an embroidery machine.
For best accuracy, professional digitizers test-stitch the file to confirm it runs smoothly and looks flawless on fabric.
Best Software for Logo-to-Stitch Conversion
To convert digital logos into stitch files efficiently, specialized embroidery digitizing software is required. Popular professional tools include Wilcom Embroidery Studio, Hatch, Pulse, and Brother PE-Design. These tools provide advanced controls for stitch type, density, and layering.
However, mastering such software takes time and experience. That’s why many businesses prefer outsourcing to experts like Quality Digitizing, where skilled professionals use premium tools to create production-ready stitch files with quick turnaround times.
Common Mistakes to Avoid During Conversion
Beginners often make errors that can affect the final embroidery quality. Here are some common mistakes to avoid when trying to convert digital logos into stitch files:
- Using low-quality or blurry images.
- Skipping proper underlay stitching.
- Ignoring fabric type when setting stitch density.
- Using too many color changes unnecessarily.
- Not testing the stitch file before production.
By avoiding these mistakes, you’ll achieve better alignment, smoother stitching, and cleaner results. For error-free output, it’s always recommended to have your logo digitized by professionals at Quality Digitizing.
Benefits of Professional Digitizing Services
Working with professional digitizers ensures accuracy, time efficiency, and high-quality results. Here are the main benefits of hiring experts:
- Precise stitch mapping and fabric optimization.
- Faster turnaround times for bulk projects.
- Machine compatibility across all major embroidery brands.
- Reduced thread breaks and minimal production issues.
Choosing a trusted service like Quality Digitizing gives you peace of mind that your designs will look exactly as intended—clean, professional, and production-ready.
Expert Tips for Perfect Stitch Files
To ensure the best results when you convert digital logos into stitch files, follow these pro-level tips:
- Always test stitch on a sample fabric before full production.
- Use high-quality threads for lasting color vibrancy.
- Adjust machine tension based on fabric thickness.
- Maintain a consistent stabilizer to avoid shifting.
For ongoing projects, establishing a partnership with a reliable digitizing company like Quality Digitizing ensures consistency in every file you produce.
Conclusion and Call to Action
Learning how to convert digital logos into stitch files opens up endless possibilities for branding, personalization, and product enhancement. With the right preparation, tools, and guidance, your digital artwork can become stunning embroidery that stands out on any fabric.
However, professional expertise makes all the difference. That’s why businesses worldwide trust Quality Digitizing for accurate, affordable, and fast embroidery file conversion. Their experienced team ensures your logos are production-ready and perfectly optimized for any embroidery machine.
Get started today and transform your digital designs into stunning stitched masterpieces with Quality Digitizing.


